Following on from our Tech Tips focusing on Microsoft Outlook, this weeks blog highlights some shortcuts and time saving tips for Microsoft Word.
Ever since its humble debut in 1983, Microsoft Word, or as it was known on release Multi-Tool Word, has revolutionised the way we
produce everything from standard text documents to labels.
Gone are the days of Microsoft Office suites beloved assistant Clippy popping up to offer you some help to compose documents, but never fear, we may not be a slightly unsettling paper clip with eyes but we have put together a selection of tips to help make your Microsoft Word experience a little bit better, keep reading to find out how to:
- Recover unsaved documents (and change your autosave options so you don't risk losing them again)
- Create your own AutoCorrect settings
- Change your sentence case quickly
- Insert commonly used sentences and phrases
- Auto update date and time
Recover unsaved documents
We have all been there, the dreaded stomach dropping feeling of losing a document that we hadn't yet saved. Whether it's from an error or
from closing the document without saving changes, don’t panic, Word does provide some options for recovering lost documents which are
always worth a try before tearing your hair out.
• Click on the File tab
• Click Open and then click Recent Documents
• Scroll to the end of all Recent Documents and then click Recover Unsaved Documents
If you find the Word document that you are looking for, double-click it to open. Breathe a giant sigh of relief and save the document immediately!
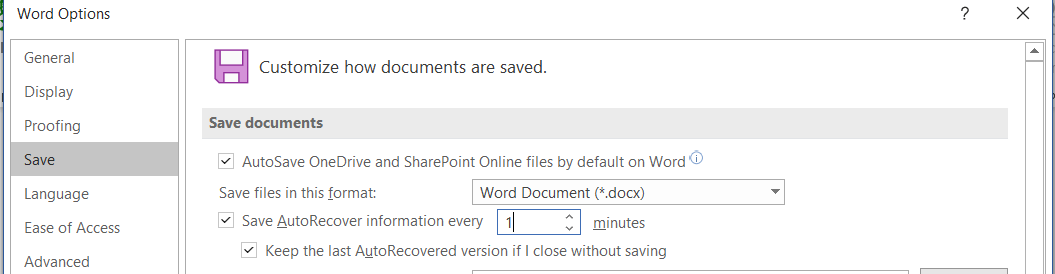
To save yourself some stress later, it is also a good idea to adjust your autosave settings in Word to save your work to OneDrive or SharePoint periodically, you can adjust it to anywhere from 1 to 10 minutes, here's how:
- Go to the File menu
- Click on Options
- Then choose the Save option from the menu.
From here, make sure the AutoSave OneDrive and SharePoint online files box is checked.
Create your own AutoCorrect settings
Have some words that you just can’t spell right? Or, are there long words or phrases you write very often? or
maybe your business name is a bit of a different take from the norm and triggers Word's spell check function every time.

You can use custom AutoCorrect settings to make your life far easier. Here's how:
- In Word click File
- then Options
- click on Proofing
- and finally, click on AutoCorrect Options.

Here's where you can then add your own custom words and the correction you’d like it to be replaced
with.
In our example we want to change Fortitech to FortiTech.
Once you have added your own preferences, click on Add and then Close.
In our case, from now on Word will automatically correct the spelling of Fortitech to FortiTech.
Not only can functions like this save you time, it can also ensure that your business name is represented correctly in your documents.
Change your sentence case quickly

Here is a quick way to change the capitalisation of any text with a click of a button and avoid embarrassing and sometimes offensive blunders without having to re-type wads of text.
-
Start by highlight the text you would like to change
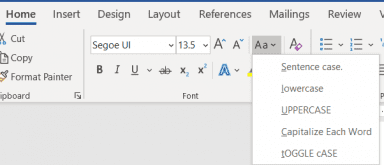
- click on the "Aa" pull-down menu in the Home Ribbon
- make your choice from the 5 options available in this menu and the highlighted text will change to your preferred case

Insert commonly used sentences and phrases
Just like you can in Microsoft Outlook, you can also insert common phrases or sentences you use with the click of a button.
Pretty handy, right?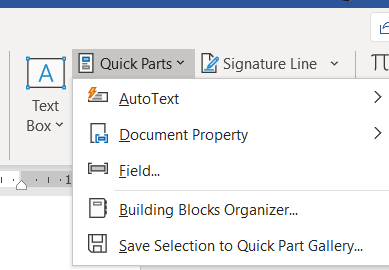
Lets say you need to include a lengthy disclaimer in all of your documents, to create that disclaimer as autotext for use in future documents run through these steps:
- Draft the disclaimer in Word and then highlight it
- Click on the Insert ribbon (next to home at the very top of the menus)
- Find Quick Parts and click on it
- Here you will see an Auto Text option, click this
- Choose Save Selection to AutoText Gallery
- Give your Autotext a name, such as Disclaimer
- Change any other settings you would like then click on OK
When you next want to insert the disclaimer into your document, just navigate back to the Auto Text option and choose it from
the gallery and your good to go.
Auto update date and time
Sometimes you have a document you use again and again, updating only a few key details. If this happens to be a document like a letter that includes the date and/or time, one nifty little trick is to allow Word to update the date automatically.
- Navigate to the Insert tab
- Click the Date & Time button and a pop-up window will appear.
- Click the date format you want and then be sure to click the "update automatically" box in the bottom-right corner.
- Now the date will automatically be updated every time you open (or print) the document.

And that rounds out another of our Microsoft Office Suite Tech Tips, we trust that you have found these Word shortcuts and timesavers useful and have the change to adopt some of them into your business.
Keep an eye out on future blogs for more tips for Microsoft Office Suite products.